Managing web servers and applications doesn’t have to be a daunting task, especially with tools designed to simplify the process. Enter Nginx Proxy Manager—a web-based interface for managing Nginx proxy hosts. It offers a straightforward setup for managing your web servers, complete with SSL certificates and user management features.
Ubuntu 24.04, known for its robust performance and security features, makes an ideal platform for deploying Nginx Proxy Manager. With this guide, you will learn how to seamlessly install and configure Nginx Proxy Manager on your Ubuntu 24.04 system.
Whether you’re a seasoned sysadmin or just getting started, this step-by-step tutorial will simplify the process, ensuring you can start managing proxies in no time. Ready to take control of your web infrastructure with ease? Let’s get started!
Installing Required Dependencies
Before diving into the installation, we need to ensure that your Ubuntu 24.04 environment is equipped with a few essential tools and packages. These dependencies lay the groundwork for a smooth installation process of Nginx Proxy Manager.
First, it’s important to update your system packages to their latest versions. Open your terminal and execute the following command:
sudo apt update && sudo apt upgrade -yNext, we need to install Docker, as Nginx Proxy Manager relies on it for containerization. If Docker isn’t already installed on your system, run:
sudo apt install docker.io -yOnce Docker is set up, we’ll also need Docker Compose, which aids in defining and running multi-container Docker applications. Install it using:
sudo apt install docker-compose -yWith Docker and Docker Compose in place, you’re now ready to proceed to the next steps, where we’ll set up Nginx Proxy Manager. These dependencies ensure that the essential infrastructure is ready for creating, running, and managing our proxy environment.
Setting Up Docker and Docker Compose
To get Nginx Proxy Manager up and running smoothly on your Ubuntu 24.04 system, setting up Docker and Docker Compose is crucial. These tools provide the necessary environment for app containerization and management, streamlining deployment and maintenance tasks.
Install Docker
Begin the Docker installation by ensuring your package repository is up to date. Open your terminal and enter:
sudo apt updateNow it’s time to install Docker. Simply run:
sudo apt install docker.io -yAfter installation, you can verify that Docker is active by checking its status:
sudo systemctl status dockerIf it’s not running, start the service using:
sudo systemctl start dockerTo ensure Docker runs on startup, enable it with:
sudo systemctl enable dockerConfigure Docker Compose
With Docker ready, let’s proceed to Docker Compose. Install it swiftly by executing:
sudo apt install docker-compose -yVerify the installation by checking its version:
docker-compose --versionBy now, your system is equipped with both Docker and Docker Compose, setting the stage for a hassle-free installation of Nginx Proxy Manager. With these tools configured, you’re all set to launch your containerized applications effortlessly.
Downloading and Running the Nginx Proxy Manager Image
With Docker and Docker Compose at your disposal, it’s time to download the Nginx Proxy Manager image and get it running. This involves pulling the necessary Docker image and setting it up using Docker Compose.
Pull the Image from Docker Hub
First, you need to pull the Nginx Proxy Manager image from Docker Hub, a central repository for publicly available container images. Open your terminal and run the following command:
docker pull jc21/nginx-proxy-manager:latestThis command fetches the latest version of the Nginx Proxy Manager image, ensuring you have access to the newest features and updates.
Run Nginx Proxy Manager with Docker Compose
Now, let’s configure and run Nginx Proxy Manager with Docker Compose. Create a docker-compose.yml file in your preferred directory and add the following content:
version: '3'
services:
  app:
    image: jc21/nginx-proxy-manager:latest
    ports:
      - "80:80"
      - "81:81"
      - "443:443"
    volumes:
      - ./data:/data
      - ./letsencrypt:/etc/letsencrypt
This configuration defines the necessary services and maps ports for easy access. Once you’ve saved the file, start up the container:
docker-compose up -dThe -d flag runs the services in detached mode, allowing them to operate in the background. With this step, Nginx Proxy Manager should be up and running, ready for you to start managing your web servers.
Accessing the Nginx Proxy Manager Web Interface
Once Nginx Proxy Manager is up and running, accessing its web interface is the next step. Open your preferred web browser and enter your server’s IP address, followed by the port 81, like so:
http://your-server-ip:81This will lead you to the Nginx Proxy Manager login page, ready for you to dive into its features.
Set Up Initial Admin Account
Upon first access, you’ll be prompted to set up your initial admin account. The default credentials are typically:
- Email:
admin@example.com - Password:
changeme
Log in with these credentials, and you’ll be taken to an admin setup screen. Here, update your email address and secure your account with a new, strong password. This ensures your proxy setup stays safe and tailored to your needs.
Configuring Your First Proxy Host
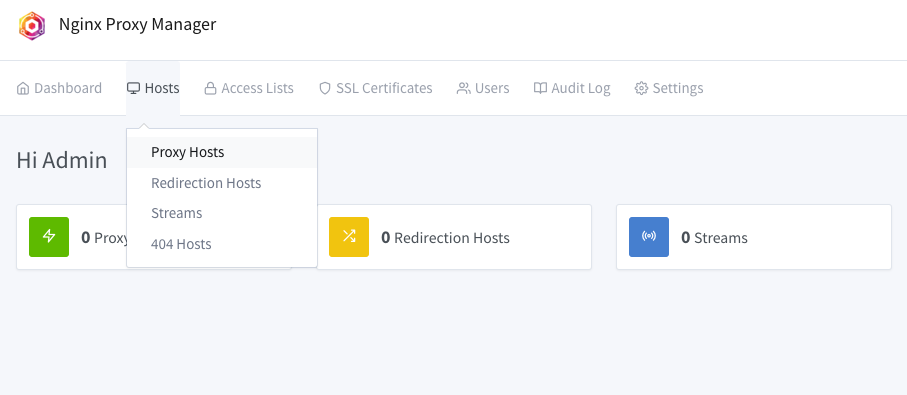
With the admin account configured, it’s time to set up your first proxy host. Click on the “Proxy Hosts” section in the dashboard, and then the “Add Proxy Host” button.
Fill in the necessary details such as the domain name, the forwarding IP, and port for the backend server. Don’t forget to enable SSL if needed by selecting the appropriate options. Once configured, hit “Save” to activate your proxy host, and you’re all set!
Conclusion
Installing Nginx Proxy Manager on Ubuntu 24.04 is a streamlined process that unlocks powerful capabilities for managing your web servers. With a few simple steps, you’ve harnessed the power of Docker and Docker Compose to deploy a flexible and user-friendly proxy management tool.
This setup not only simplifies the handling of proxies and SSL certificates but also enhances the security and efficiency of your web infrastructure. Now, with Nginx Proxy Manager in place, managing multiple domains, setting up routing rules, and applying SSL encryption is more accessible than ever.
Remember, this tool isn’t just about simplifying tasks—it’s about empowering you to maintain and scale your web services with confidence. Enjoy the ease of managing your server environment and explore the full potential of what your setup can achieve.


