Uptime Kuma is a sleek and user-friendly monitoring tool perfect for tracking the uptime status of your websites and servers. It’s a fantastic open-source alternative that promises detailed insights and reliability.
In this guide, we’ll walk through installing and configuring Uptime Kuma on Ubuntu 24.04, a process that’s simpler than you might think. Whether you’re a seasoned sysadmin or a beginner, this step-by-step tutorial is designed to be approachable and straightforward.
Ready to get started? Before you know it, you’ll have a fully operational monitoring dashboard that delivers real-time updates and peace of mind. Let’s dive in!
Preparing Your Ubuntu 24.04 Environment
Before diving into the installation, it’s essential to prepare your Ubuntu 24.04 environment. Proper preparation ensures a smooth setup experience, eliminating potential hiccups before they even surface.
System Requirements Check
First things first, let’s verify that your system meets the minimum requirements. Uptime Kuma doesn’t demand heavy resources but does need a server with at least 1 GB of RAM and a stable internet connection for optimal performance. Having a little extra space on your hard drive is also beneficial for storing logs and configuration files.
Update and Upgrade Packages
Keeping your system up-to-date is crucial for security and stability. Open up your terminal and execute the following commands to update your package list and upgrade existing packages:
sudo apt update sudo apt upgrade -y
Running these commands freshens your system with the latest updates and fixes, ensuring that Uptime Kuma runs without a hitch. It’s always a good practice before installing new software, so you’re all set for the next steps!
Installing Uptime Kuma on Ubuntu 24.04
Now that your system is ready, let’s get UptimeKuma up and running on your Ubuntu 24.04 server. We’ll guide you through the essential steps with ease.
Downloading the UptimeKuma Repository
First, you’ll want to clone the UptimeKuma repository from GitHub. This repository contains everything you need to install and set up the application. Fire up your terminal and enter the following command:
git clone https://github.com/louislam/uptime-kuma.git
Once cloned, navigate into the directory with:
cd uptime-kuma
Essential Command Line Instructions
Inside the UptimeKuma directory, it’s time to install the necessary dependencies. Make sure you have Node.js installed, as it is crucial for running Uptime Kuma. If you don’t, you can install it via:
sudo apt install nodejs npm
Then, execute the following command to install the required packages:
npm install
With these steps completed, you’ve ensured that Uptime Kuma is set up and ready to roll. The hardest part is over, and you’re well on your way to efficient monitoring with UptimeKuma!
Configuring UptimeKuma for Optimal Performance
With UptimeKuma installed, you’re on your way to setting up an efficient monitoring system. Now, let’s dive into some essential configurations to ensure it runs smoothly and meets your needs.
Accessing Uptime Kuma Interface
To start, you’ll need to access the Uptime Kuma web interface. Open your web browser and navigate to http://your-server-ip:3001. You’ll be greeted with a sleek login screen. If it’s your first time, create an account using the straightforward registration process.
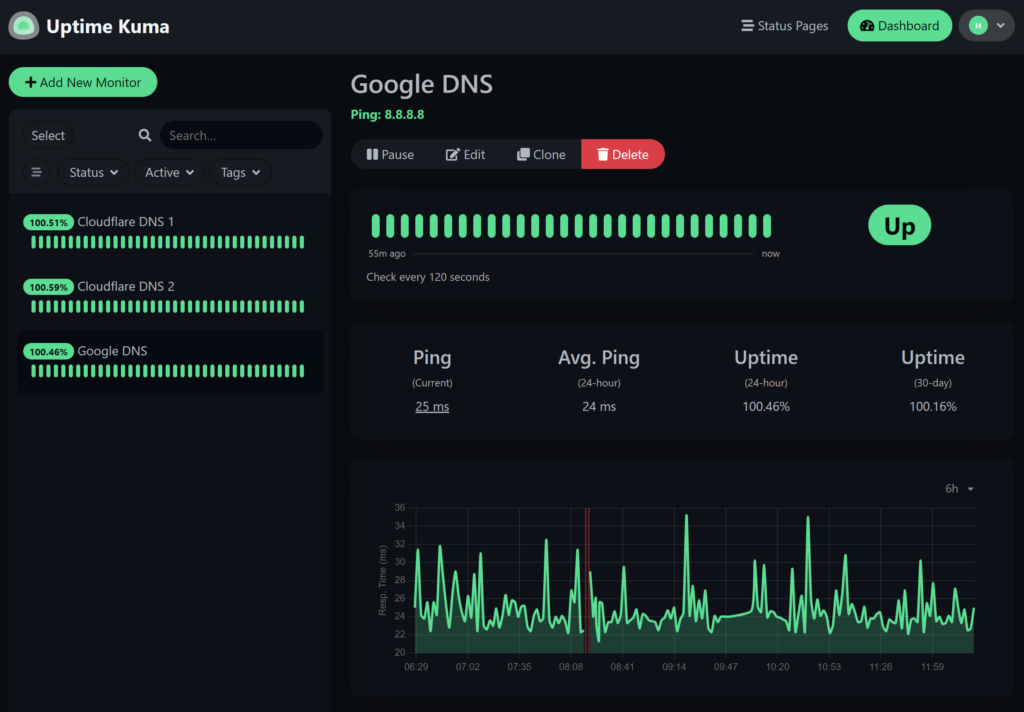
Once logged in, you’ll find a dashboard that visually represents your monitored websites and services. It’s both intuitive and comprehensive, making it easy to get to grips with your system’s health at a glance.
Adjusting Monitoring Preferences
Now, let’s fine-tune your settings. Head over to the “Settings” tab to tailor your monitoring preferences. Here, you can configure notification settings, thresholds for alerts, and specify the interval frequency of checks to suit your needs.
You can also add the websites or servers you wish to monitor by using the “Add New Monitor” button. Fill out the necessary details, and UptimeKuma will handle the rest, providing real-time updates on your system’s performance.
With these configurations, you’re all set to take full control of your system monitoring and maintain ultimate uptime!
Troubleshooting Common Installation Issues
Even the smoothest installations can hit a snag or two. Don’t worry—these common issues are easy to tackle with a bit of troubleshooting.
First up, if you encounter permission errors, ensure your user has the necessary access rights. You can try rerunning your commands with sudo to elevate privileges.
If the server isn’t responding on your specified port, check any firewall settings that might be blocking access. Use UFW status to verify and adjust rules as needed.
Debugging Tips and Tricks
For debugging, start by checking Uptime Kuma’s logs. These logs can provide valuable insights into what’s going wrong. Access them by navigating to the UptimeKuma directory and looking for log files or running the server in a terminal to see real-time output.
If npm dependencies are causing issues, clearing your npm cache can help. Run npm cache clean –force followed by a reinstall with npm install.
Lastly, make sure your Node.js installation is up-to-date. Compatibility issues often stem from outdated versions, so check with node -v and update if necessary. With these tips, you’re equipped to handle any hiccups on your path to a seamless UptimeKuma experience!
Conclusion
And there you have it—a complete guide to installing and configuring Uptime Kuma on Ubuntu 24.04! You’ve transformed your server into a powerful tool for monitoring uptime and ensuring everything stays on track.
With Uptime Kuma up and running, you now have a reliable watchdog keeping a vigilant eye on your websites and servers. Remember, the interface is intuitive, making it easy to adjust settings and expand your monitoring capabilities as needed.
Regularly check your dashboards, tweak your preferences, and make full use of notifications to stay informed and proactive. Embrace this newfound visibility and enjoy the peace of mind that comes with a well-monitored environment. Happy monitoring!


