If you’re on a quest to find a powerful, user-friendly control panel for your cloud-hosted environments, CloudPanel might just be your perfect match. Whether you’re managing web applications or databases, this sleek, streamlined interface is designed to take the hassle out of server and application management.
With Ubuntu 24.04 humming along as your platform, this guide will walk you through the straightforward process of installing and configuring CloudPanel. The latest Ubuntu version is known for its rock-solid stability and enhanced features, creating an ideal foundation for your CloudPanel installation.
By the end of this post, you’ll have a fully functional setup, ready to efficiently manage resources like a pro. So, grab a cup of coffee and let’s dive into setting up your cloud environment with ease and simplicity.
Installing CloudPanel on Ubuntu 24.04
Getting started with CloudPanel on Ubuntu 24.04 is a breeze! Before jumping in, you’ll need to ensure that your system aligns with the necessary prerequisites. Once you’re set, the installation process is just a few commands away, making setup quick and straightforward.
System Requirements for CloudPanel
To ensure smooth sailing, double-check that your server meets CloudPanel’s minimum requirements. You’ll need a 64-bit version of Ubuntu 24.04, at least 1 GB of RAM (though 2 GB is recommended for optimal performance), and a minimum of 20 GB of hard disk space. A stable internet connection is crucial for downloading packages and updates during the installation process.
Downloading CloudPanel Installer
With your system primed and ready, it’s time to grab the installer. Head over to the official CloudPanel website to download the latest version. The installer script takes care of everything, from dependency checks to downloading necessary components. You’ll be guided through each step with prompts that make installation incredibly user-friendly. Once the download is complete, you’ll be well on your way to deploying your powerful, new control panel.
Configuring Your Ubuntu for CloudPanel
Before installing CloudPanel, we need to tailor your Ubuntu environment to ensure it’s ready to welcome its new guest. This involves a couple of quick steps like updating your system and configuring the firewall to protect your setup while keeping CloudPanel running smoothly.
Updating Ubuntu Packages
First up, let’s make sure all your packages are up to date. This ensures you’re running the latest and greatest, minimizing compatibility issues and security vulnerabilities. Open your terminal and run the following commands:
sudo apt update
sudo apt upgrade -y
These commands will search for and install the most recent versions of your installed software packages.
Configuring Firewall for CloudPanel
Next, it’s firewall time. To keep your server safe yet accessible, you’ll need to configure the firewall to allow CloudPanel traffic. Ubuntu’s uncomplicated firewall (UFW) is an excellent tool for this.
Start by enabling UFW:
sudo ufw enableThen, open ports 80 (HTTP) and 443 (HTTPS) to ensure CloudPanel can communicate freely:
sudo ufw allow 80
sudo ufw allow 443
Now, your Ubuntu system is primed and ready for CloudPanel installation!
Setting Up CloudPanel
With your prerequisites in place, it’s time to get CloudPanel up and running. The process is straightforward and streamlined, ensuring a hassle-free setup. CloudPanel’s installer script does most of the heavy lifting, guiding you through the necessary steps.
Running the CloudPanel Installer
Start by accessing your server via SSH. Once logged in, download and run the CloudPanel installer script. You can typically execute it with a command like:
curl -sSL https://download.cloudpanel.io/install.sh | sudo bashThis will kick off the installation, watching over the required dependencies and configurations. It’s automatic and quick, so you won’t be stuck watching install logs for too long!
Initial CloudPanel Configuration
With CloudPanel installed, it’s time to tweak a few settings to suit your needs. When you first access CloudPanel through your browser, you’ll be greeted with a setup wizard. Follow the prompts to create an admin account, configure preferred settings, and set up your domains.
This initial configuration tailors your CloudPanel experience, setting the stage for effortless management of tasks and resources. Now, take a moment to explore—you’re officially ready to manage your cloud environment with CloudPanel!
Managing Services in CloudPanel
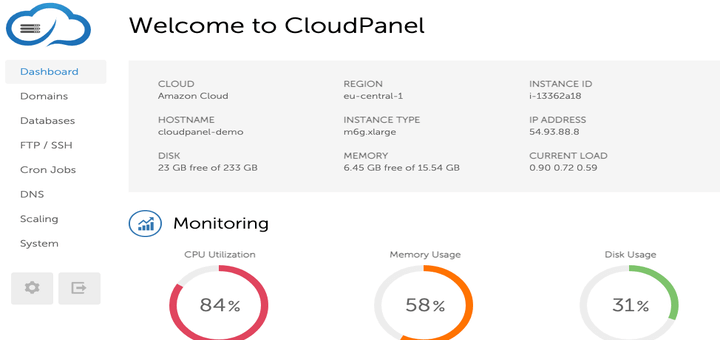
Once CloudPanel is up and running, managing services becomes a breeze. The intuitive dashboard offers at-a-glance access to all your server components. You can easily start, stop, or restart services such as Nginx, MySQL, and PHP with just a click, ensuring everything runs smoothly.
CloudPanel also includes a monitoring feature, allowing you to keep an eye on resource usage. This helps in identifying any potential bottlenecks before they escalate, making server management both proactive and efficient.
Adding Domains and Websites
One of CloudPanel’s standout features is its ability to effortlessly handle domains and websites. Within the dashboard, navigate to the “Websites” section to add new domains. Enter your domain information and choose your desired configuration settings.
Once set up, CloudPanel automates many tasks, like SSL certificate generation through Let’s Encrypt. This means your websites are secure from the get-go, providing peace of mind for you and your users.
From hobby projects to enterprise-level sites, CloudPanel’s structure ensures your web presence is robust and scalable, making domain and site management an absolute breeze.
Conclusion on Installing and Configuring CloudPanel
So, there you have it! Installing and configuring CloudPanel on Ubuntu 24.04 is a straightforward journey that transforms your server management experience. With a few simple steps, you’ve now empowered your Ubuntu server with a robust control panel that simplifies web hosting tasks and streamlines resource management.
From setting up essential configurations to getting your domains and websites online, CloudPanel takes care of the heavy lifting, allowing you to focus on what matters most—growing and managing your applications effectively.
Now that you’re all set up, take some time to explore CloudPanel’s features. Its intuitive interface offers a rich toolkit for handling everything from service management to security configurations, empowering you with complete control over your cloud environment. Enjoy the seamless efficiency and control that CloudPanel brings to your server management!


