Are you ready to streamline your server management with the powerful combination of AlmaLinux 9 and the versatile Control Web Panel (CWP)? This guide is here to help you unlock the potential of your server setup in no time.
AlmaLinux 9, an enterprise-grade, open-source Linux distribution, offers robust performance and stability. Pairing it with Control Web Panel provides an intuitive interface, allowing you to manage your hosting environments effortlessly. Whether you’re refining your web space or hosting multiple sites, this duo can handle it all.
In the following sections, we’ll guide you step-by-step through the installation process and share insights on configuring your server for maximum efficiency. So, buckle up as we dive into bringing your server management to the next level with AlmaLinux 9 and Control Web Panel!
Downloading Control Web Panel
Getting started with Control Web Panel (CWP) on AlmaLinux 9 requires a straightforward download process. First, ensure your system is up-to-date by executing:
sudo dnf update -yWith your system ready, the next step is to fetch the CWP installation script. This script automates most of the installation process, saving you time and effort:
cd /usr/local/src
wget http://centos-webpanel.com/cwp-el8-latest
This command navigates to your /usr/local/src directory and retrieves the latest CWP script tailored for CentOS 8, which is fully compatible with AlmaLinux 9.
Once downloaded, the script will be at your disposal. Prepare for the installation by verifying that your server meets the necessary requirements, as a pre-check ensures a smooth and seamless installation process.
Execution of the script will follow in the next steps, guiding you through the complete setup with ease. Stay tuned as we configure your system for optimal performance with CWP.
Setting Up Your Server Environment
Before diving into the installation, it’s crucial to ensure your server environment is properly set up for AlmaLinux 9 and Control Web Panel.
Start by ensuring your server meets the necessary hardware requirements. You’ll want at least 1GB of RAM and a minimum of 10GB of disk space. These specs are essential for optimal performance.
Next, verify that your server time is synchronized. Accurate server time helps prevent installation headaches down the line. Configure it using the Network Time Protocol (NTP) with:
sudo dnf install chrony -y
sudo systemctl enable --now chronyd
Firewall configuration is also key. Open necessary ports by updating your firewall settings to allow HTTP, HTTPS, and SSH traffic:
sudo firewall-cmd --permanent --add-service=http
sudo firewall-cmd --permanent --add-service=https
sudo firewall-cmd --permanent --add-service=ssh
sudo firewall-cmd --reload
Additionally, consider setting a hostname for your server. This will help identify your server on the network and can be set using:
sudo hostnamectl set-hostname your-new-hostnameWith these preparations, your server environment is now ready to install and run Control Web Panel efficiently. Let’s move on to the installation process to get you fully operational!
To install Control Web Panel, simply run:
sudo sh cwp-el8-latestConfiguration of Control Web Panel on AlmaLinux 9
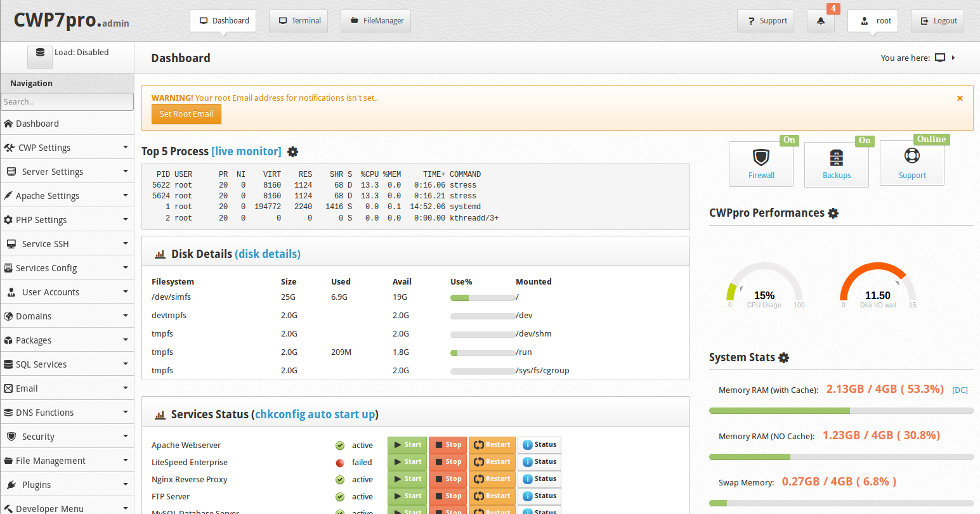
With Control Web Panel installed, it’s time to tailor it for your needs. Begin by accessing the CWP admin interface through your browser. Simply enter your server’s IP address followed by port 2030 (e.g., http://your-server-ip:2030).
Log in using the admin credentials displayed at the end of the installation. Once inside, you’ll find a dashboard filled with options to manage your server efficiently.
First, configure your server’s basic settings. Navigate to the ‘Server Settings’ section, where you can update your time zone, set sender emails, and adjust other defaults that fit your needs.
To enhance security, head over to the ‘Security’ tab. Set up the firewall, implement IP blocking, and ensure SSH security features are active. CWP makes security management straightforward and effective.
Next, optimize your web hosting environment by configuring the ‘Domains’ and ‘Databases’ sections. Add new domains, subdomains, and easily manage MySQL or PostgreSQL databases using the built-in tools.
Finally, explore the variety of features in CWP to automate tasks, monitor performance, and maintain your server’s health. With these configurations, your Control Web Panel setup on AlmaLinux 9 is ready to handle anything you throw at it!
Conclusion
Congratulations! You’ve successfully navigated the installation and configuration of Control Web Panel on AlmaLinux 9. With your server now fully operational, you’re equipped to manage your hosting environments with greater efficiency and ease.
By harnessing the power of AlmaLinux’s stability and CWP’s user-friendly interface, you’re set to handle anything from basic hosting to more complex applications. This robust setup offers scalability and flexibility, ensuring your server can grow with your needs.
As you explore more features and optimize your configuration, you’ll uncover new possibilities to enhance your server’s capabilities. Whether you’re hosting websites, managing databases, or streamlining security, the resources at your disposal are formidable.
Remember, server management is a dynamic process, and keeping abreast of updates and best practices will help you maintain optimal performance. Here’s to smoother server operations and a more efficient workflow!


